Showing posts with label Photography: How to. Show all posts

Friday, November 30, 2012

Never Let Them See You Sweat?

How many winemakers, creatives and yes, even photographers, who really care, expose the grit, determination and work it takes? I've just learned that "never let them see you sweat" is bad advice.

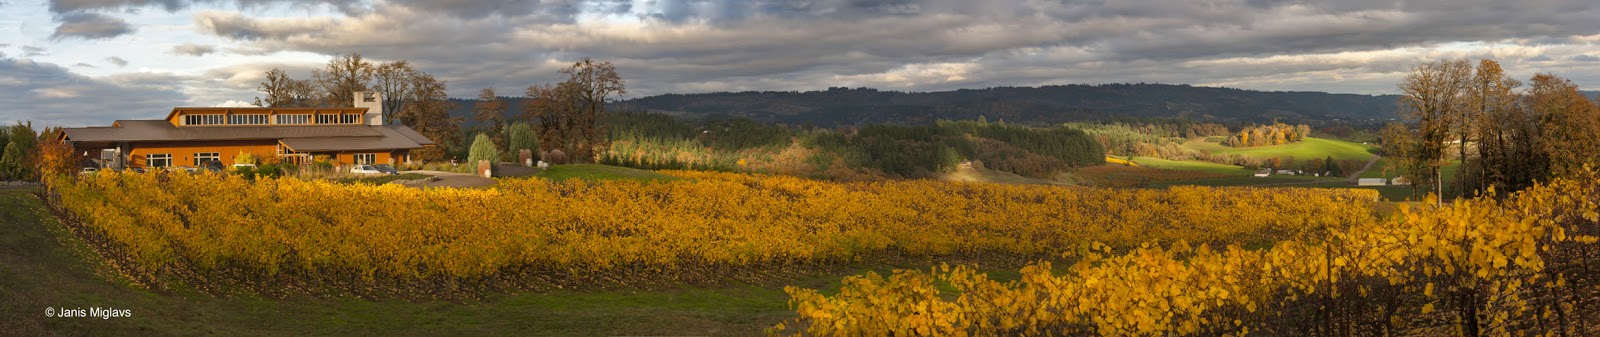
Fall Breaking Storm over Penner Ash Wine Cellars and the Willamette Valley.
After adjusting each of the 21 individual frames in the RAW File Converter, I stitched this panorama together. But it has rough edges and flat contrast, even after adjusting before stitching.
Check out the adjustment layers that created the more painterly look below. Each area is carefully selected and painted. This is the kind of work I did on canvas during my Masters of Art Degree.
I'm working to create an emotionally engaging image; one that brings joy and a sense of awe.
Isn't it the sweat that makes a piece of work individual?

Wednesday, March 17, 2010

True: Three Carry-ons for Photographers

Alaska/Horizon Airline indignantly awakened my cheapness.

I just didn't want to pay their $15 per checked bag fee–that's each way
–for a photo/interview trip to Napa. What to do? Then I recalled reading somewhere that photographers could carry their camera bag on board in addition to the one carry one and one personal item.

A not-so-quick check of the TSA web site confirmed it was true. Just in case, I also called Alaska Airlines to find that their policy also allowed the extra camera bag if TSA allowed. We're covered.

Here's the exact wording from the TSA web site: "You may carry one (1) bag of photographic equipment in addition to one (1) carry-on and one (1) personal item through the screening checkpoint. The additional bag must conform to your air carrier's carry-on restrictions for size and weight. Please confirm your air carrier's restrictions prior to arriving at the airport.
Air carriers may or may not allow the additional carry-on item on their aircraft.
Please check with your air carrier prior to arriving at the airport.
"

(Those of you lawyer types probably noted that the bold wording allows the airline to over ride the TSA rules. So be prudent. Check with your airline customer service, who I have found to have no clue so default to TSA rules. Although I didn't get the Alaska/Horizon Airline special photographer's baggage policy in writing, it might not hurt to do so.)


Now I felt confident in my ability to circumvent the baggage fee. So I jammed my tripod and underwear into a borrowed carry on-sized suitcase (Alaska allows 10"X17"X24"), packed my camera gear into my well-padded Tamarc backpack
(Alaska allows up to 10"X17"X24"), put my MacBook Pro and paper work into my personal-sized laptop case and dutifully marched for the security line.

No problem through security. But at the gate, the Horizon representative carefully counted my three bags. Almost in disbelief at the results of her count, she informed me: "You are only allowed
one carry one and one personal item."
Ah, with the elegant manners of a French diplomat, I replied–three times–my TSA and Alaska Airlines findings. "I even have it in writing."

"Let me see," the gate keeper demanded, yanking the paper from my hand.

After reading the printed TSA web site
statement, the representative attached a bright orange tag to my bag. This was my all-clear pass, indicating that I could bring this extra photo-equipment bag on board. She then thanked me for educating her and the handful of other curious gate personnel who had gathered.

Napa here I come.


Monday, November 30, 2009

Maintenance man does plastic surgery while buffing table

It's late Sunday. The end is in sight of this 29-image apartment digital maintenance job for my Arizona client. The request on this photograph was to "buff out the ping pong table, reduce the glare on the wall behind the treadmill and minimize ceiling ventilation system." And correct for perspective.

Buffing the table scratches was easy using the buffing (Adobe calls it clone or healing) tool in Camera Raw Converter.


The bright sun spot on the wall behind the treadmill–which I personally liked–was much more difficult. Selecting the area and using curves didn't work very well.


Digital plastic surgery to the rescue. I selected a section of the wall to the right of the treadmill and pasted it on top of the bright spot. But the selection wasn't large enough, so I pasted the selection again slightly to the left, overlapping the first paste job. With a little change in opacity and some masking on the edges, it looked like a pro plastic surgeon job.


Arrg to that bright spot on the carpet. No problem. Plastic surgery to the rescue again. I found a piece about the same texture size towards the middle of the room and pasted it on top of the hot carpet, corrected color and luminosty and went for a glass of wine, leaving my Mac to save the Maintenance Man's surgery for posterity.


Wednesday, November 25, 2009

Maintenance Man survives on Bread & Butter

Wednesday: I continue optimizing and digitally cleaning up apartments for my Arizona client. This is what pros call Bread & Butter work. I love Bread & Butter.


Removing the signs under the light took more than an hour because of the uneven light. If the light were even, it would have been a 2 minute job.

So how many other changes do you see between the before (above) and after (below) photos? (I just realized I left all of the color corrections in the before photo.)


Monday, November 23, 2009

Monday: spent the day cleaning Apartments

Today I spent the day cleaning up apartments.

That's digitally cleaning them for clients. Some manage complexes that are not necessarily the most glamorous on the block. But my clients need attractive bait to reel in customers. So I clean up apartments for the fishermen (and women). Actually, I really enjoy the challenge.

You can see the kind of cleaning I do from these before (top) and after (bottom) photographs. This one was simple and took only a few moments. Please be kind. Tell me that you could never tell the cleaning just from the after photo.


Thursday, November 19, 2009

My Publisher Goes Bankrupt

After 30-some years as one of the most respected Table Top Photographic Book publishers, Graphic Arts Publishing went belly up. Mike Campbell, the main marketing/sales guy, lamented it was a combination of the state of book publishing and the economy. Michael Powell, owner of Powell's Books, blames the demise on declining book sales, the difficult economy and fewer independent bookstores, which was "the bread and butter for them."

So what does this storm in the publishing world mean for my latest little book?
I can't see the whole picture yet for the waves.

The immediate consequences:
• I'm having troubles ordering the book. One Ingram (the giant distributor which bought part of Graphic Arts) representative told me, "all of the books in the warehouse were spoken for." Sounds as if there are no more books.
• I have to fill out a one-page Ingram form, which they are suppose to have emailed, so that I can even be on the list to order books. Then I get a 30-40% discount instead of the contracted 50%. Irrelevant if there are no books.
• Don't know the status of a second printing.

When I decided to go with Graphic Arts for Oregon The Taste of Wine, I knew they were on shaky soil. But Ingram–they must represent some 100 publishers–had just bought part of the company. I thought no problem.

Lesson learned:
• In the next book contract I need more than the standard "Failure to Perform" clause. I need to address belly upping. I think it's a trend for book publishing.
• My next books will have a strong web component. I love picture books. Stay tuned, two are grinding in the mill.

I would appreciate suggestions,
philosophical or practical.

Thursday, December 11, 2008

Landscape in a Glass

Many ask how I did this photograph in my latest book, Oregon: The Taste of Wine. It's a vineyard landscape (Sunset over Adelsheim's Bryan Creek vineyard) in a Oregon Pinot glass made by glassware maker Rydel.

It's actually quite simple. Here's what I did:

1) Pour some deep red wine a clean Oregon Pinot glass.
2) Then comes the part requiring discipline: don't drink the wine.
3) Set it on the railing of our back deck.

4) Use my Nikon 60mm Macro lens to photograph the glass, ensuring that a nice landscape is seen in stem. Yes, that landscape is the part of view that we get from our deck.
5) Load the image into Photoshop to drop in the landscape in the dark wine. Set the landscape layer to Blending Mode: Lighten
6) Use the Liquify tool to give the landscape a swirl.


Nothing hidden here. Here are the actual Photoshop Adjustment Layers showing exactly what I did to achieve the Landsape in a Glass photograph.

Friday, August 1, 2008

Creating the Vineyard Landscape Photograph

For me, creating an image for publication or print is more than shoot and print. I call the process image optimization.


For example this photograph, Fog and Fall Colors over Willamette Valley Vineyards, was originally taken on 645 Velvia film, scanned and optimized. I usually complete the optimization adjustments in the following order: (Vineyard in foreground is Bella Vida and background is Knudsen in the Red Hills above Dundee, Oregon.)

1) If the image is not already in the Pro Photo RGB color space, I will convert it. I want all of my Legacy Images in this larger color space because in the future we will have the technology to take advantage of the additional colors.

2) Create a duplicate background layer which I spot for any dust. I like to have this duplicate layer in case the background layer somehow gets corrupted. I had one group of images where the background layer was corrupted by a bad Firewire cable connecting the working hard drive to the storage hard drive.

3) Begin with global adjustments, usually Levels and Hue Saturation.


4) Although I didn't do so for this image, then I usually duplicate the dust spotted background, make it a smart object, and do a shadow/highlight adjustment.

5) Then I usually make fine adjustments to the image, beginning with large areas, continuing to smaller and smaller areas. Check out how monor adjustments affect the final image.


I'm not sure how clear this will be on some monitors, but I've darkened a selected area with a Curves Adjustment Layer.


6) Often I will use Select>Color Range to select and adjust specific color areas.

7) Finally, I'll duplicate the background (with the shadow/highlight adjustment if I've used that), make it a smart object (again if I've used shadow/highlight) and sharpen the image for the specific size it will be used. Notice that I've masked some of the sharpened layer so that not all of the areas are sharpened equally. By making the sharpened layer a Smart Object, I can change the amount of sharpening for each output. Remember that a 20X24 image for print needs more sharpening than a 72 ppi web image. With the Smart Object layer I can sharpen to size and need

8) Obviously I've saved the image as I work, but finally I save a Master File. This final master file needed to be saved as a PSB file–yes, that's PSB not PSD. With all of the layers, the 16 bit master file is 2.04 Gigabytes. Photoshop requires anything over 2 GB to be saved as a "Large Document Format" filed, thus PSB as in Photoshop Big.

9) I save the Master File on at least three separate hard drives, two in the studio and one which is stored off site.

Friday, June 20, 2008

Making a Wow Photograph


Image straight from camera


Photoshop layers
showing what it
took to optimize
the image.


Sometimes people ask me, "Well, aren't you shooting digital?" Within that simple interrogative comes an assumption that I just snap and print. Yes, that's possible. But I'm interested in making my photographs sing. When I'm finished creating an image, the reaction I'm hoping for is "Wow, that's a great photo."

So I just wanted show the work that goes into the making of a single photograph. The screen shot shows the Photoshop layers that went into creating the above simple photograph. And just to give you a sense of scale, most of my digital capture images end up being about 450-500 MB, with some exceeding 2 GB.